The Axiomatic Object
Title: Pace Yourself, Be Honest
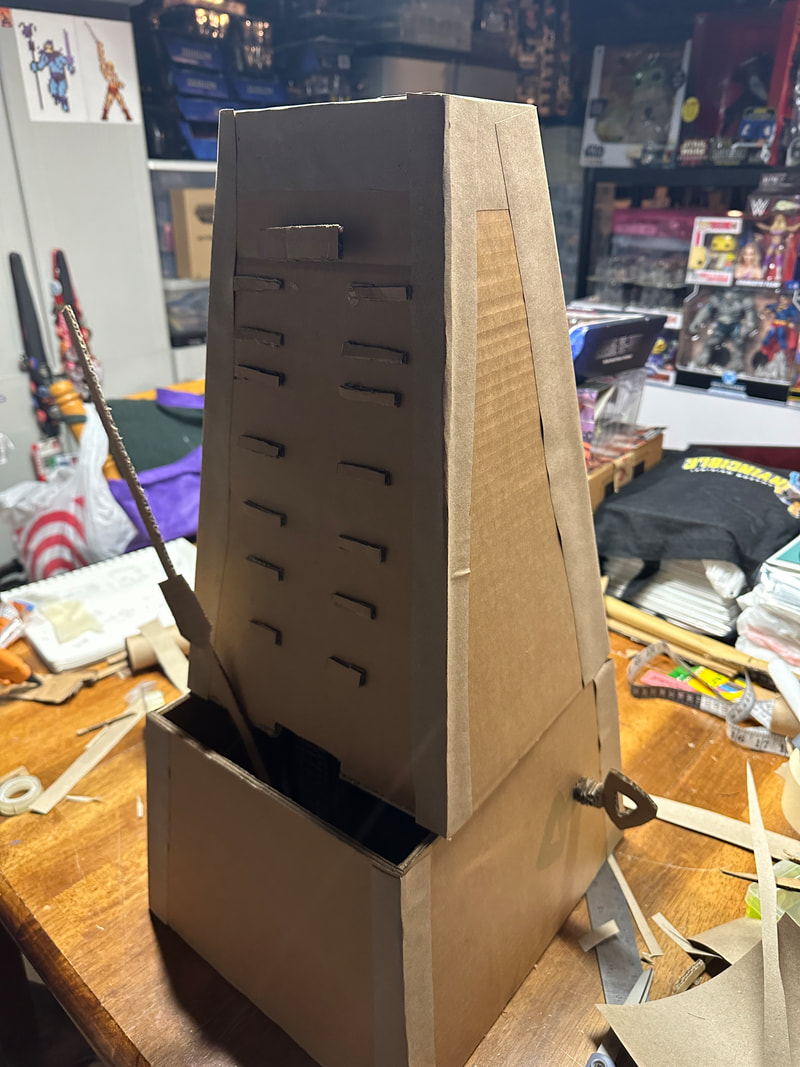
Size: 27 cm x 30 cm x 39 cm
Medium: Cardboard
Completion Date: January 19, 2023
Exhibition Text:
My axiomatic object of a metronome represents the need of pacing and being honest and true with oneself. As a musician, I use the metronome to practice and build up the tempo at which I play songs at. It helps me be honest with myself for if I have a handle on the song and allows me to keep a steady pace not speeding up or slowing down when practicing. I have to choose what to set my tempo at and then see if it works out. A person chooses their own tempo of life and should be honest with it.

|

|

|
Inspiration:

Gretsch Country Gent by Chris Gilmour
|
Artist in Focus: Chris Gilmour
The artist I used as inspiration is Chris Gilmour. He is a British Sculptor who creates life-sized recreations of everyday objects out of cardboard. I intend to take inspiration from the smooth look of the cardboard as can be seen in his piece “Gretsch Country Gent” with the body of the guitar looking to be very smooth and not rough. I would also like to stick with just the normal cardboard brown color as well to not have too much going on which can be mainly seen in Gilmour’s works. It helps keep the piece from having a certain part stand out more than it should and also connecting the piece together to make it one. I would also like to try and get the round corners or at least a smooth corner or transition from side to side to help it look nicer. When looking at his cardboard replicas, you can instantly see what it is supposed to be. I would like to try and achieve that with my object as well. Gilmour is also taking these very specific things to the objects and making sure to add in all that detail. I would like to do similar by making it possible to actually work to give it the extra feeling of it actually being a metronome. |

Vespa Rally by Chris Gilmour
|
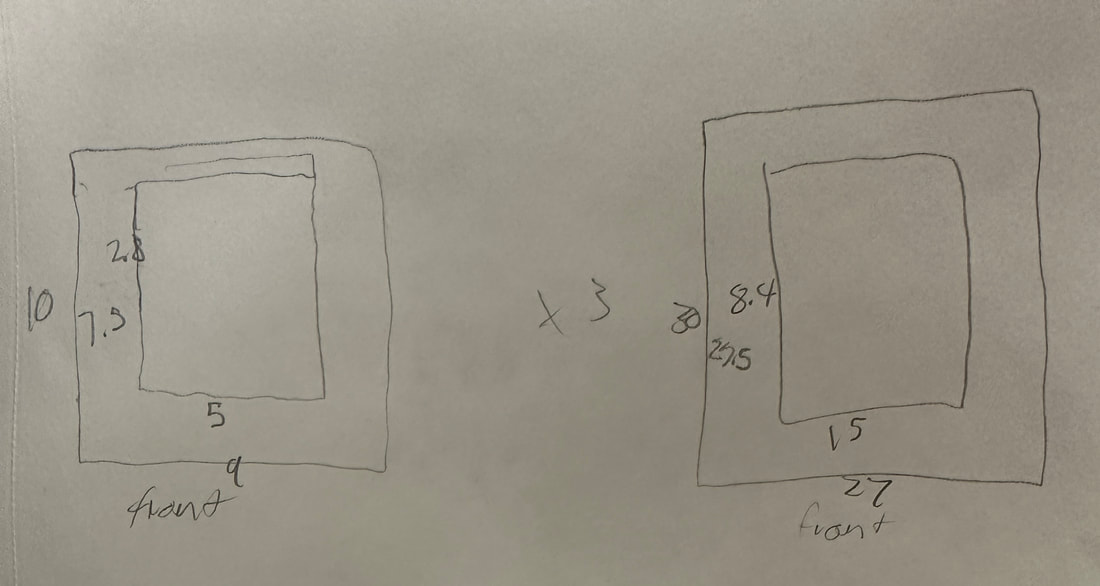
Planning:
When the project was introduced I knew from the start that I wanted to make my cardboard object based on a metronome. I started out by taking my metronome and starting to do some basic measurements to get an idea of scale and size. I originally wanted to do a scale size of 5x but realized that not only would it be probably too big but I would also not have enough cardboard to make the project at such a size. I then tried out different scale sizes and decided to go with a scale of 3x. I then took more precise measurements of the metronome I had. I made sure to get all the different sizes I need including the length of the pendulum and even the winding key. After getting everything measured, I then just took all the measurements and multiplied them by 3 and wrote down those on a separate sketch of the object. After getting everything down, I went to work on actually making my piece.

|

|
|
Process:
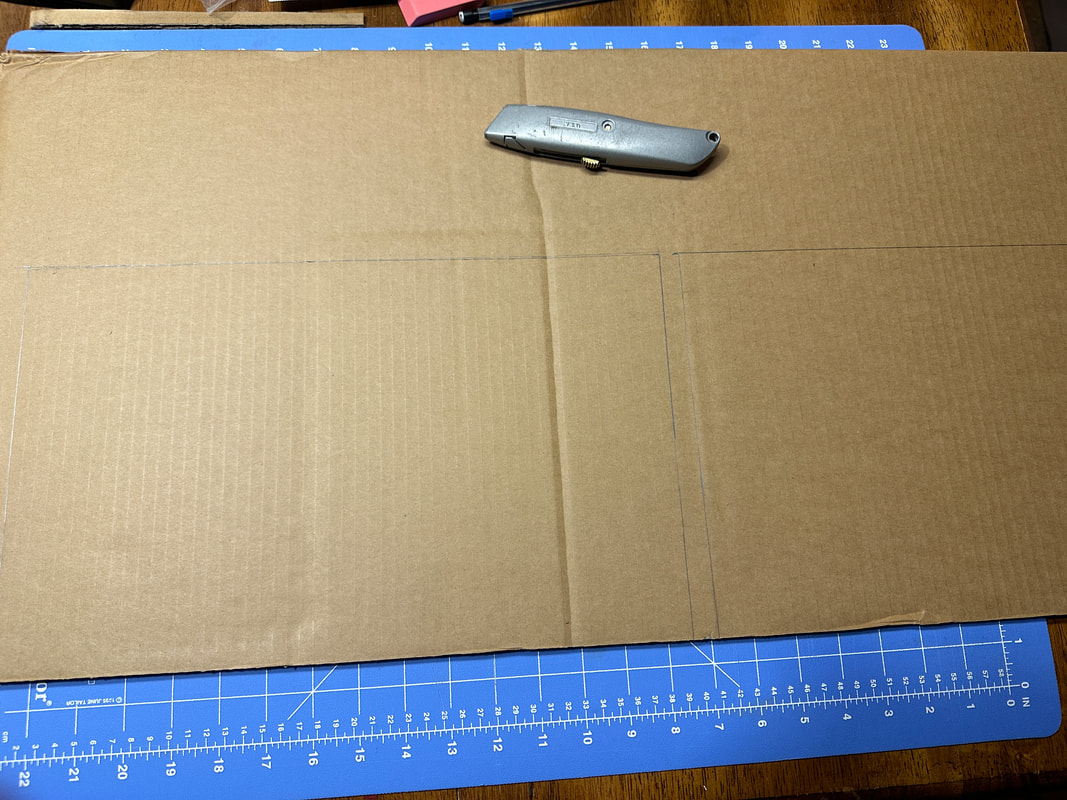
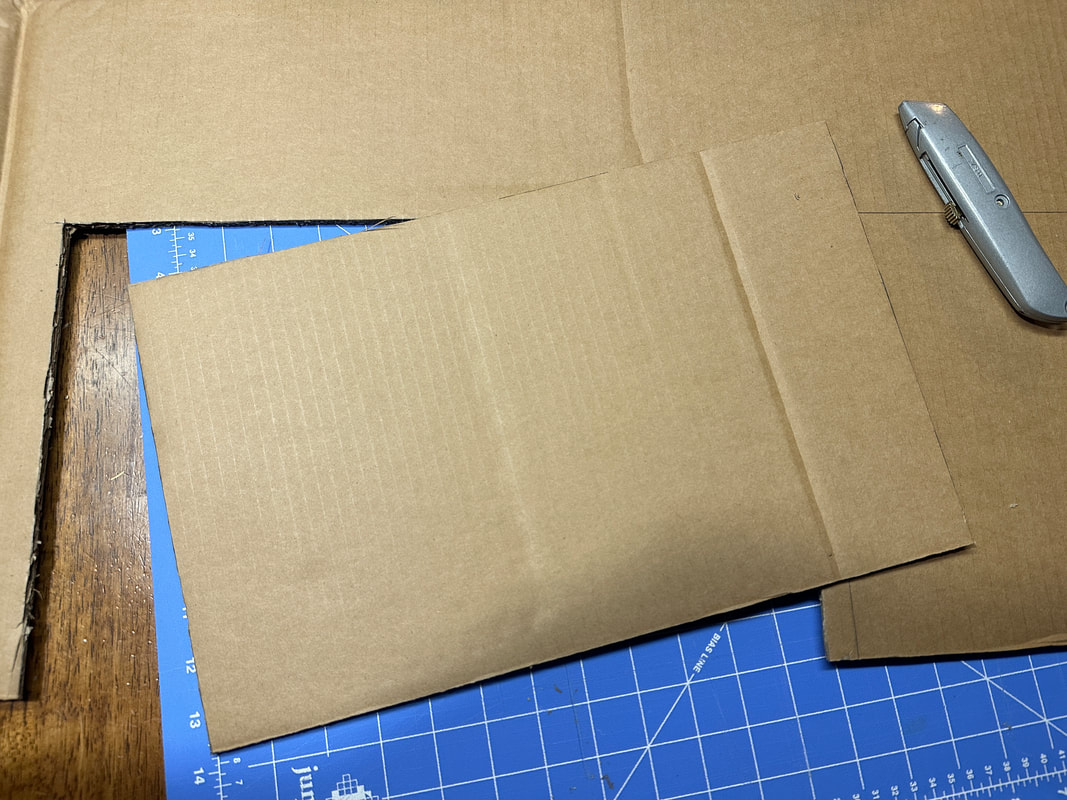
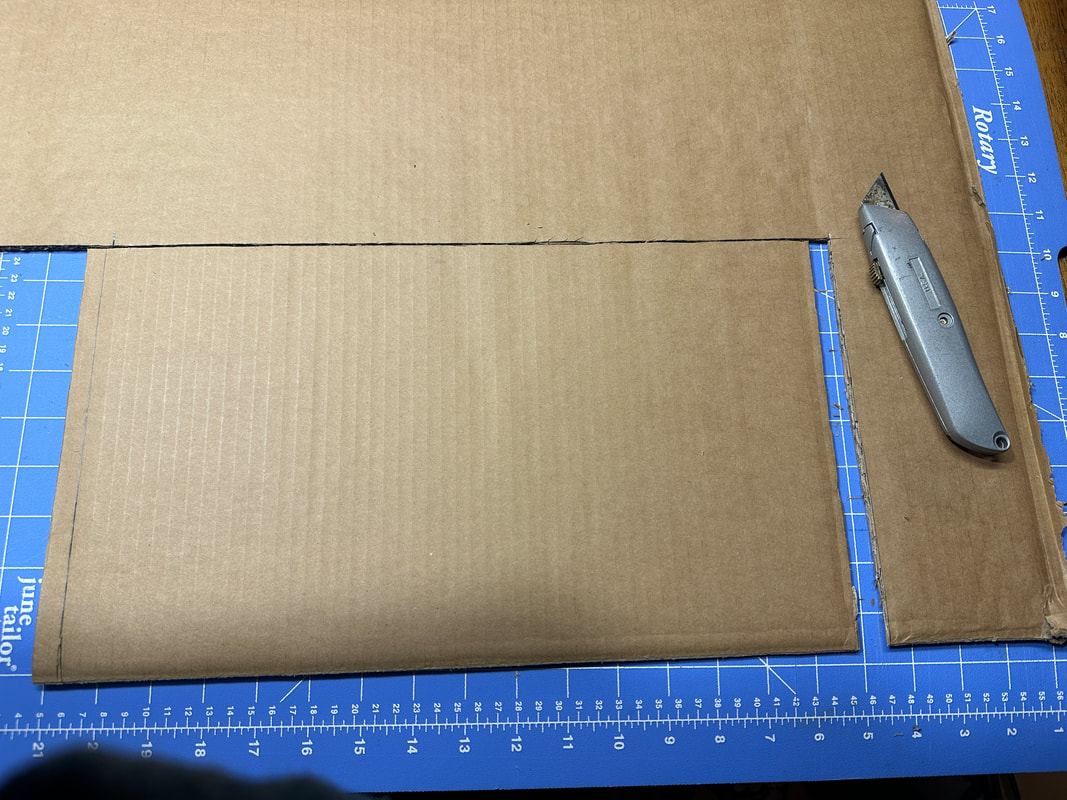
To start off, I had a big box that I took and broke down. After breaking it down I separated each of the longer sides from each other so that I had big, long pieces of cardboard to make my piece out of. Once I had the big pieces, I started sketching out the sides of the metronome to then cut out later. I decided to just make big rectangles of the dimensions of the sides and then cut out the curves and slants of it when I was actually putting it together. After getting the sides cut out I had to worry about sketching and cutting out the smaller details of the piece. I had to cut out the pendulum shape, the winding key, the bell tone selector, the sliding weight, and the securing hook all in rectangle shapes to then fine tune later.
|
|
|
|
FInally I had everything cut out and I could start assembling my metronome. I decided to build it in two parts, being the top and bottom, so that I could actually put my physical metronome inside of it to help my plan on making my cardboard metronome actually move. I wanted to start with the bottom section so I gathered all of those parts. I then started gluing the parts together starting with the sides and front. I had to make sure that the sides were all at the correct angle so I set it up with some objects to hold it up against the bottom of the top part. I used masking tape to hold the pieces in place correctly, and then started gluing the parts to the base plate, and then to each other.

|


|
The last part I had to attach on the base was the back. The thing that made this a little different is that it was curved. To handle the curve on it, I compressed the cardboard to be thinner at where I would bend it. I then put the bottom of the back on the back so that I could glue just the bottom part. I then continued to glue the sides to the rest of it by rotating the base so that I would slowly curve the back piece and attach it to the base. I then had the bottom done and moved onto the top. I used a similar process by using masking tape to position the pieces correctly and got the front, back, and right side on it. I had to line it up so that I was cutting the cardboard to make it slanted and then glue it all together. After getting the three sides together I then glued the top to the top. I then started cutting out the winding key and bell tone selector along with little circles for the rods they are attached to and put it together and on the base.

|

|
Experimentation:
I then had to work out how to get the metronome actually working. I had gotten feedback that I could put my metronome inside to try and pull the cardboard pendulum. I had messed around with it a bit and realized that the actual pendulum was not strong enough to pull the cardboard pendulum at all. It would be too heavy to move at all. I then realized the cardboard can slip right on the pendulum to move but it was still too heavy. I realized I could separate the cardboard to make it lighter and it would still attach so I did that and it started to work but it would get a little stuck. I then set the metronome at the highest speed to get it to move faster and with more strength possibly and it did work. It was moving back and forth with ease. I then set it inside the base and put the top on and realized that the pendulum was too short compared to everything else. I had to lift up the metronome somehow so I just found a box and messed around to see if the top or bottom of it would lift it up enough. It did work in raising it up, however I now had to cut out a slot from the base of the top to get it to fit in correctly. I cut out a small rectangle out of the bottom and slipped it back on to see if it would work. It fit nicely but then the pendulum would not move as it was stuck and touching the top part of the metronome, thus keeping it from moving. I wasn’t too sure how I would go about fixing it. I had figured out that I would have to move the front back a bit so that the pendulum had space to move. To do that, I had to cut through the hot glue I already put on it from connecting it to the base which was a struggle. Once they were separated again, I had to then push the front inwards to make it so that it was connecting to the top of the base rather than the side. I had to keep it in one area, glue it, wait for it to dry, and then go to the other side, and glue it.

Once I had done that, I had to cut out more from the base to make sure the metronome could still fit as it didn’t if I just tried to put it on. After cutting it out, I put it on, and gave the pendulum a nudge to see if it would work. It did work, however I had to have it in the exact right position. From there I put some brown paper on the edges to sort of clean it up and give it a handmade look. I also considered adding in little lines for different tempo speeds which I did do.

|

|
|
Critique:

|

|
|
There are some similarities that can be seen in my piece compared to my inspiration. For one, I managed to get that mostly smooth lookon the base and body of the object. It is also similar in that I maintained all one solid color of the normal cardboard brown as Gilmour uses in his work. I also manged to get some of the smoothness on the edges as can be seen in some of Gilmour's work by using the brown paper on my piece. I also feel that it is similar as I managed to capture the look of a metronome in my piece. I am emphasizing the key features such as having the metronome move.
There are also some differences that can be seen between my work and my inspiration. For one, while I did get the smoothness similar, Gilmour has some very clean and smooth transitions he does in his pieces without the paper and just using cardboard. Being able to create smooth transitions as he did would have been ideal but I couldn't capture it. Another difference is the specific detail work of our works. Gilmour has very detailed pieces getting everything down from every nook and cranny. My piece does include some detail, however it is not nearly enough as I could have had on there such as more markings.
There are also some differences that can be seen between my work and my inspiration. For one, while I did get the smoothness similar, Gilmour has some very clean and smooth transitions he does in his pieces without the paper and just using cardboard. Being able to create smooth transitions as he did would have been ideal but I couldn't capture it. Another difference is the specific detail work of our works. Gilmour has very detailed pieces getting everything down from every nook and cranny. My piece does include some detail, however it is not nearly enough as I could have had on there such as more markings.
Reflection:
This project helped me with my 3d artwork skills and just cardboard skills in general. I have never really worked with cardboard to make an object other than one other time so it was relatively new. This project allowed me to be more comfortable with 3d art making. I personally really enjoyed using cardboard to make an object like I did, and would not mind doing something like this again. I wasn’t as big of a fan of having to do all the measuring and cutting out the specific shapes but it is very necessary. I was also not fond of the troubles I had to go through with getting it working, however it did in the end. This definitely tied into my other precise measurements I had to do in my perceptions of Identity painting as I had to use precise measurements here too. I hope others view my work and know what it is, and can get an idea of the deeper meaning behind it of making your own time and needing to be honest with yourself.
Connecting to the ACT:
Clearly explain how you are able to identify the cause effect relationship between your inspiration and its effect on your artwork?
In my inspiration, there is very smooth, solid colored cardboard which can be seen in my piece for the most part as well. You could also see how I tried to make the edges more smooth and firm like in Gilmour's work by adding in the brown paper on the edges.
What is the overall approach the author has regarding the topic of your inspiration?
My inspiration has affected my approach on overall look of the piece whether it be getting the smooth surfaces or sharp edges or even details in the work to make it seem like it is that object.
What kind of generalizations and conclusions have you discovered about people, ideas, culture, etc. while you researched your inspiration?
I have discovered some different ideas that can come out of making a cardboard object. Making something everyday out of cardboard gives a new perspective on it and makes you question it's importance. It allows you to admire the work from a new set of eyes.
What is the central idea or theme around your inspirational research?
The theme around my inspirational research is the layout and design of a piece. What and what not to include and how to make it look correct.
What kind of inferences did you make while reading your research?
I inferred Gilmour's specific reasons for making his cardboard pieces. Why make a cardboard car or a guitar? It gets the viewer to question the object and see it in a new light. These objects also represent greater things. They are specific but vague enough where they can represent different ideas.
Citations (MLA):
Blulab, Staff. “Chris Gilmour - Artists - Guidi4art.” Guidi, Marine Accessories, 3 Sept. 2018, https://www.guidisrl.it/en/chris-gilmour/.
“Chris Gilmour Artworks.” Chris Gilmour, http://www.chrisgilmour.com/.
Chris Gilmour | Biography - Mutualart.com. https://www.mutualart.com/Artist/Chris-Gilmour/42EE9257E39C0DFB/Biography.
“Chris Gilmour Artworks.” Chris Gilmour, http://www.chrisgilmour.com/.
Chris Gilmour | Biography - Mutualart.com. https://www.mutualart.com/Artist/Chris-Gilmour/42EE9257E39C0DFB/Biography.
